
Let you click a picture of yourself or any model. Now you have to use it on a project or anywhere. But the one thing that is bothering you in this picture is yellow teeth. Want to know how to whiten teeth in Photoshop?
We all know that Photoshop is a wonderful tool for editing your pictures.
In the type of situations where you want little changes in pictures but you want them to be as natural as the original clicked image then Photoshop is the best tool to use.
However, because Photoshop is so flexible in terms of picture editing, there are instances when we are worried by the time-consuming task.
If you don’t want to use those time-consuming methods of doing things in Photoshop.
You just want to whiten teeth in Photoshop and don’t want to consume time on every picture by doing a long method of that so you are at the right place.
In this article, I’ll show you to whiten teeth in Photoshop in quick and easy steps to do and you are good to go in just some clicks.
And also the results will be as natural as the original picture.
Let’s Go For It!
Table of Contents
Step 1: Opening Image in Photoshop
First of all, you have to Open your portrait image in Adobe Photoshop. For this, you can simply drag and drop on the Photoshop interface to open the image.
You can also go to File > Open on the top left corner.
In my case, it is a women’s portrait smiling picture in which the teeth of the model are yellowish and bothering me for professional use so I have to whiten them using Photoshop.

Step 2: Hue/Saturation Adjustment Layer in Photoshop
After having your image opened in Photoshop you have to go to Layers Panel and go to the bottom left corner to add an adjustment layer.
From the adjustment layers menu, select and add the Hue/Saturation Adjustment Layer.

Now double click on the thumbnail of Hue/Saturation Adjustment Layer to open its properties.
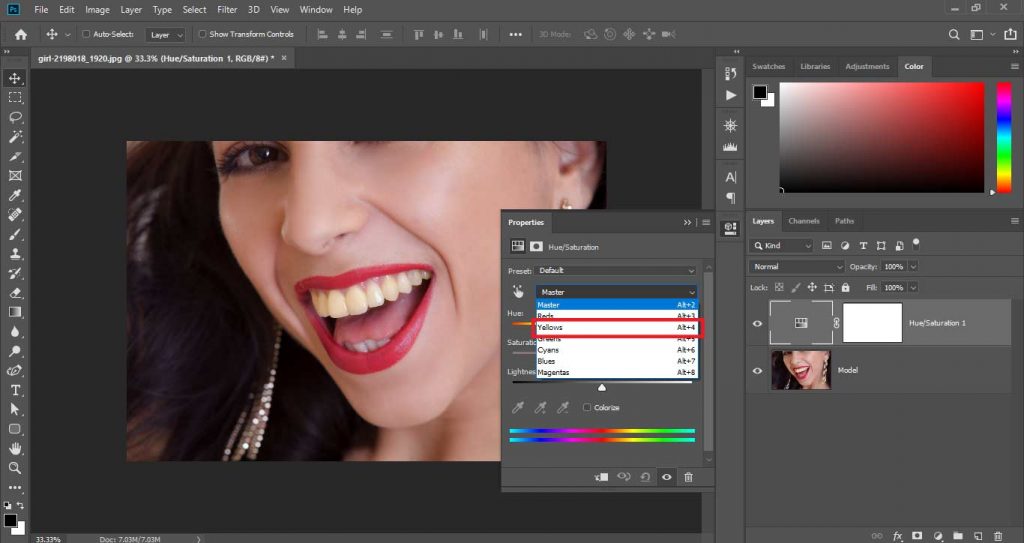
Then in the properties of the Hue/Saturation Adjustment layer, you will see a color selection bar where Master is already selected by default. This bar will be below the Preset bar.

Click on the option where Master is written and from the Drop-Down Menu select Yellows to target the yellow color only.
By setting this to yellow we make sure that any changes we make in Hue, Saturation, or Lightness will only affect the yellows in the image.
Any other colors of the picture like reds or blues will not be affected by changing the values of yellows.
By targeting only yellows of the picture we are affecting the yellow part of teeth and as we know you have to get rid of yellowness on teeth.
In order to do that we have to bring the Saturation slider all the way to the left to set its value to -100. This will get rid of all the yellow color and make teeth look white.

Step 3: Brightening Teeth in Photoshop
Now on decreasing the Saturation of yellows, we got the white teeth but now we have to make the teeth a little brighter.
To do that we just have to go to that Hue/Saturation Layer.
Similarly, as we did before, target the yellows of the image by selecting yellows from the colors drop-down menu.
Now to make teeth a little brighter you just have to change the value of lightness which is below Saturation.
Take the Lightness slider to a little right and set the value to +75.
Also, You can set lightness according to your image because if we increase it too much the picture maybe look unnatural.
We don’t want it. +75 is the value that worked best for me in this particular picture.
This will give a brighter look to teeth to make them look more whitened.

Step 4: Masking Hue/Saturation Adjustment Layer in Photoshop
After doing all these steps we successfully whiten teeth in Photoshop but we have affected the skin and other parts of the image also by changing the Saturation of yellows as only teeth are not the area in which we have yellows.
Also, there are other parts of the image where we have yellows but we don’t want to affect them during brightening our teeth so we have to remove the effect from that part and make these adjustments only limited to teeth.
Masking is the best way to do that.
Related: Learn all about Layer Masks and how to use them in Photoshop (The Ultimate Guide).
For this, we have to select the mask of Hue/Saturation Adjustment Layer by simply clicking on it, and also we have to invert the mask to remove all adjustments.
Windows:
We just have to press Control + I for inverting layer masks.
Mac:
We just have to press Command + I for inverting layer masks.

After inverting the layer mask we have our effect erased from the image.
Now select Brush Tool from Tools Panel and select a Soft Round Brush.
Make sure the Foreground color is white.

Now paint on the teeth area to bring back the adjustment effect only to the teeth area.
Paint on the area with white.
Then if you want to remove the effect from any part of the picture just press X to toggle between the colors and make the Foreground color Black and paint on the area where you want to remove the effect.

Conclusion:
Now we have our teeth whiten in Photoshop very naturally in just 4 simple steps and once you learned these steps you are good to go and also you can solve any yellow teeth problem in just one minute by applying these steps.
Also, these steps are so easy to do in a quick way there is no need to be so accurate about anything.

Video For More Quick Info:

I’m a Graphic Designer with 5+ years of experience. Specialized in Adobe Photoshop.
Get Info About Any Photoshop Editing, Photoshop Manipulation, Logo Design, Flyers, Business Card, Cartoon Portrait and any type of work-related to Graphic Design and Photoshop Editing.


