To become a skilled logo designer, you’ll need to learn some basic techniques, such as how to make a logo transparent in Photoshop. It is not about just logos, the actual process stays the same for any picture in which you want the background to be transparent. It’s one of the most frequently asked questions by designers, as many individuals have trouble making their logo translucent.
We are not here to just follow a single process and move on. We are here to understand the main idea and main concept about how to make any background transparent.
Making a logo translucent is not a tough task, but it does necessitate main understanding. In this post, we’ll take a quick look at the many graphic design techniques that may be used to make a logo transparent as well as these techniques can be used in making any background transparent.
Firstly, let’s go over some fundamentals of the format and presentation of a Transparent Logo in detail.
Table of Contents
What is Transparent Logo in PNG Format?
If we are saying a Transparent Logo, it doesn’t mean the logo is invisible, it means we have a transparent background behind the logo and it is mainly stored in PNG format so that we can use it on any design.
A PNG is a sort of image file that doesn’t contain a backdrop color. Most photos include color in all of their pixels, even if it is white, and they cover a particular number of pixels. Nothing is in the backdrop pixels of a transparent background, enabling what’s behind it to shine through.
If you are using a logo with a white or any background behind it then, it would not look good on other designs.
Let’s take an example of a logo with a background and another that is transparent on the same design.
The background is the white box behind the logo. It appears amateurish and sloppy, and it may clash with the background color of websites, brochures, or other artwork.
You’ll want to make sure your logo looks beautiful on every page of your website, whether it’s for freelance work, a small business, or a non-profit.
You must create a transparent PNG that effortlessly fits with your page and designs unless you want to change the colors on your site.
What is the main difference between a JPG, PNG and GIF file?
You must understand the differences between several picture formats if you are a designer. It is required since it has a direct impact on the final outcome of your design, particularly in terms of size and quality.
We’ll look at the main differences between JPG format, PNG format, and GIF format.
What is JPG Format?
JPG is the most often used picture format among designers worldwide. It is not a transparent format, but it does provide a full-color pixel structure.
So, what exactly does this imply?
It means that developing logos in JPG format is strictly prohibited. It’s best used for photos that need to be high-resolution. Those photographs, when converted to JPG, can flawlessly display a wonderful mix of art and visual excellence.
What is PNG Format?
PNG is a file format that lets you make transparent images with no background colors or tints. It employs a colorless pixel arrangement to create a flawless image with a completely translucent appearance.
That is why all expert designers strongly advise using it to create logos. It provides a lightweight, simple transparent image that may be applied over any other design.
What is GIF Format?
GIF is similar to PNG, except it is not suggested for usage in logo design. The reason for this is that it has a rather high compression rate, resulting in very large image size.
Meanwhile, the quality of images made with GIFs is inferior to that of PNG or JPG. When creating a GIF with Photoshop, the majority of them become pixelated due to the poor resolution.
Mostly, we use GIFs for animated pictures like moving objects or you can say a video of 3 to 4 seconds but it is not exactly a video it’s GIF.
Before you begin making a logo transparent in Photoshop, you must first choose a logo to work with. When it comes to creating a unique logo, many people turn to expert logo designers.
Related: Learn to covert Low-Resolution Logo to High-Resolution Vector Logo in Photoshop.
When you make a logo in Photoshop, you get a file that may be used as a brand message for your website, landing page, or social media account, among other things.
How to Make a Logo Transparent in Photoshop
There are various reasons why people learn how to produce a translucent logo in Photoshop. The most prevalent problem is that the color of a logo and the color of a website clash, lowering the content’s aesthetic appeal.
Another common issue is that a logo diverts attention away from your website’s graphics. I’ll go over each stage in detail below to assist you to understand the process and make the whole thing as simple as possible.

Opening Logo & Unlocking Layer in Photoshop
Obviously, First of all, we have to open our logo in Photoshop.
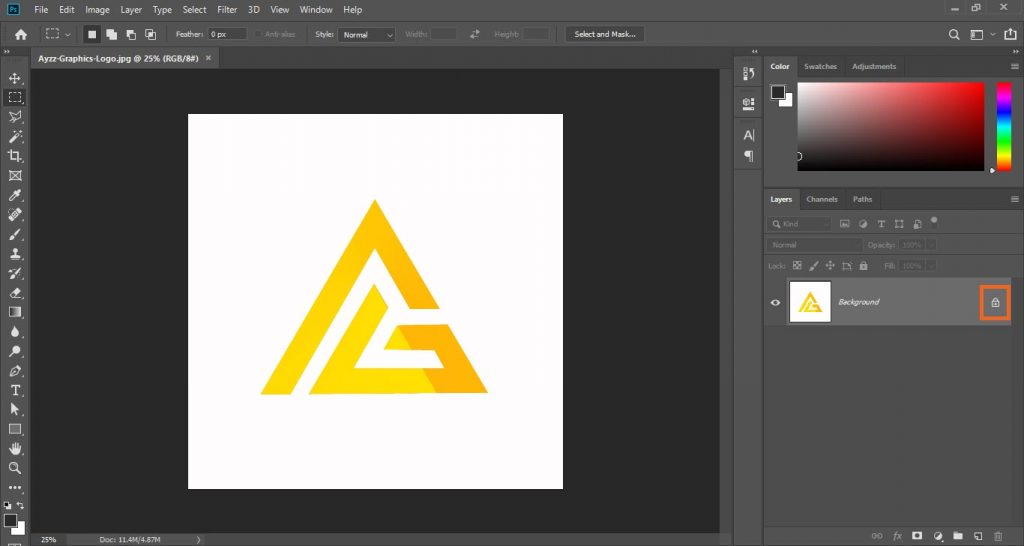
For this, go to the top menu and select “File” > “Open.” Select a logo file. The selected logo will appear in the working area, allowing you to make edits.
It’s not uncommon for a logo to be locked in the “Layers” section. To proceed with additional editing, you must first unlock it. For this go to Layers Panel and click on the lock on the layer of the logo to unlock it.

Selecting Logo in Photoshop
For selection, you can use any tool to select the logo. For this, I’m using Magic Wand Tool.
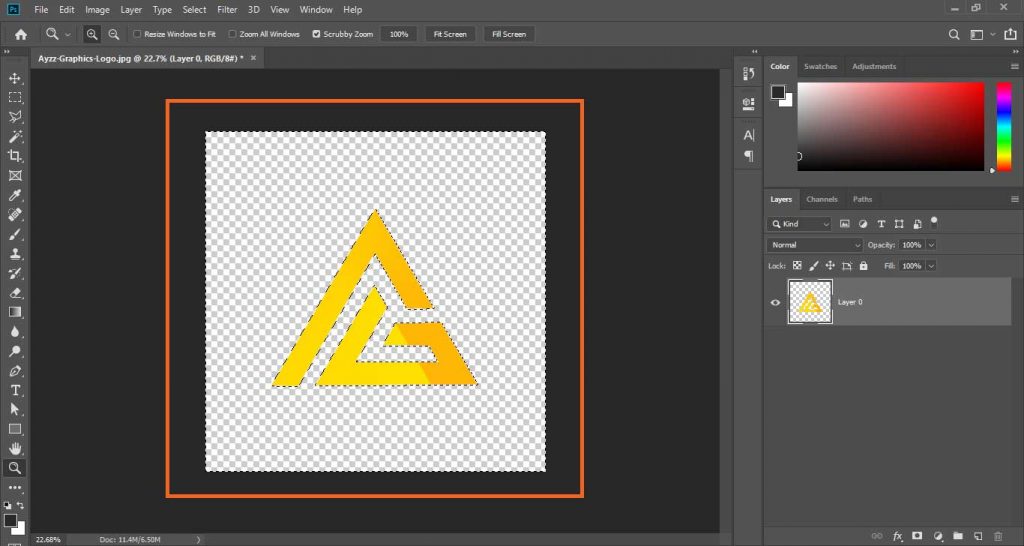
Select the Magic Want tool from tools and click on the logo area not on the background area. Click on all of the logos to select each part of them. This will create black and white lines like ants around the logo.

Removing Background in Photoshop
After you’ve selected the logo, you have to invert the selection to select all parts of the image other than the logo.
And to invert the selection Press Ctrl + Shift + I on PC and Cmd + Shift + I on Mac.
Now the area other than the logo is selected and you just have to delete that area. You can simply press delete to remove the background.

You can also make Layer Mask from Layers Panel for non-destructive deletion and you don’t have to invert selection when making Layer Mask.
The logo is now has a transparent background and you can use it anywhere.
Saving Logo File in Photoshop
You now know how to make a logo transparent in Photoshop.
As a consequence, save your file as a PNG image to use it anywhere you want as we learned above that PNG is the format that keeps transparent backgrounds.
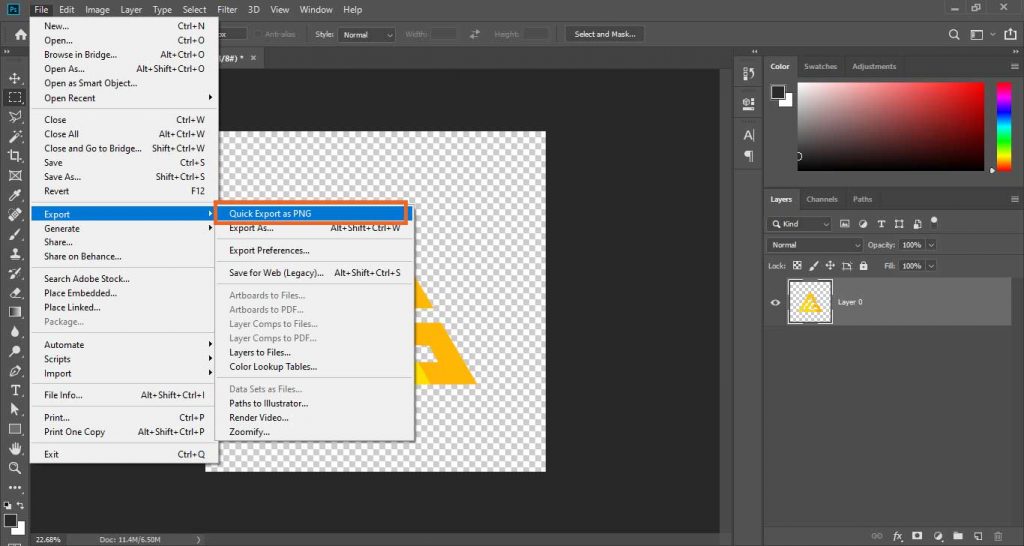
Select File > Export > Quick Export as PNG from the drop-down menu.

Alternatively, go to the top menu and select File > Save as > Set Name and Set the file format to PNG (*.PNG) from the drop-down menu. To complete the process, click “Save.”
PNG files keep transparency and are excellent for compression, so saving a logo as a PNG picture is a good choice. Transparency is not preserved in JPEG photographs, on the other hand.
What is the Best Online Tool to Make a Logo Transparent?
For producing translucent logos, there are various sorts of software available. Each of them has its own set of functionality and editing tools.
These various forms of design tools have streamlined the logo development process nowadays. They have a number of advanced features on their platform that the end-user may employ to their maximum potential.
The best tool I can suggest you Is Remove.bg, it is a website to remove the background of any image or logos to make them transparent.
If you wanted to learn all about Remove.bg, let me know in the comment section, I’ll answer you as soon as possible and if you need I’ll make a detailed article about that so that you can export the highest quality of your logo transparent.
How to use Transparent Logo on Different Designs
If you want to safeguard your design with a watermark or at least reduce the odds that a third party would use your work without your permission, or you have to add the logo to your design, using a transparent logo is a terrific option.
Putting Logo on designs is so simple:
Open the Image or Design
Go to File > Open and browse the file to open it in Photoshop.
Add the Logo to Your Image
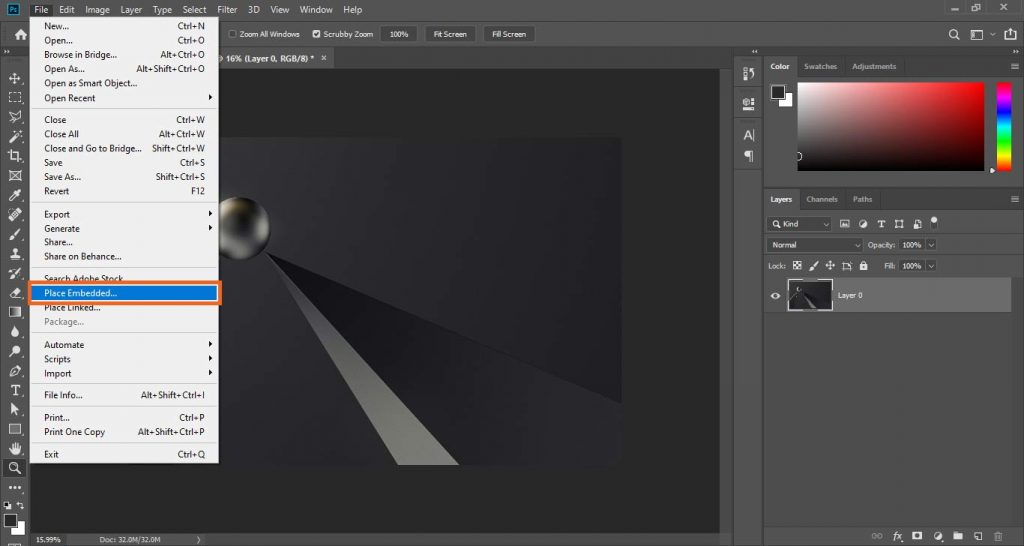
To place the logo on your image you can just Drag & Drop it on the document or go to File > Place Embedded and select the logo PNG.

Adjust Your Logo as Needed
We’ve added the logo to the chosen photo. Drag it to relocate or resize it. I decided to leave the logo in the upper left corner of my design.
Now you can save your design and use it anywhere you want.

Conclusion | How to Make a Logo Transparent in Photoshop
We’ve learned how to make the background of a logo transparent in Photoshop, how to use it in other designs as well to export it for later usage. I believe this knowledge was very helpful to you. Please leave a remark below if you have any questions or ideas.
Happy Editing!

I’m a Graphic Designer with 5+ years of experience. Specialized in Adobe Photoshop.
Get Info About Any Photoshop Editing, Photoshop Manipulation, Logo Design, Flyers, Business Card, Cartoon Portrait and any type of work-related to Graphic Design and Photoshop Editing.


