
Wanted to know how to photoshop someone into a picture and get one person from an image and transfer it to another image? You’re in right place.
You can add a person as well as an object in a picture and make the real composites you want in Adobe Photoshop.
If you have a photo of yourself and one of a lovely beach, you might want to add yourself to the beach. Another scenario is if you have a photo of a customer and they want you to place them next to a famous person.
You can do all these things in just Adobe Photoshop by reading this article.
It’s a simple compositing measure that opens up unending imaginative freedoms for blending and coordinating with individuals, places, and times without ideally raising an excessive amount of doubt.
Also, if you simply want to remove a background in Photoshop instead we also have this tutorial for you.
In this article, I’ll show you how to how to photoshop someone into a picture and in the most simplest and realistic way.
So, Let’s Go For It!
Related: Learn How to Blur in Photoshop (Realistic Blur Effect)
Table of Contents
Opening Image In Photoshop
First of all, you have to Open both images, the image in which you have your object or person and the second picture of the scene where you want the person to be. For this, you can simply drag and drop on the Photoshop interface to open the image.
You can also go to File > Open on the top left corner.
Selecting The Person
The next thing you have to do is to select the object/person of the picture.
You can use any selection tool to select that part but you have to be a little accurate.
So we have various kinds of determination devices in Photoshop, You can utilize Marquee or Lasso Tool yet the most incredible in my idea is Pen Tool.
But for newer versions and for easy ways using the Quick Selection tool, roughly select the person you want to extract.
You can also press Select Subject to select the subject of the picture by Photoshop A.I.

Figures with a spotless foundation are by and large simpler to extract.
In the event that your experience is occupied, we prescribe utilizing the Pen Tool to make a more exact way around the figure, which you would then be able to change over into a choice – essentially right snap in the wake of drawing away and afterward select Make Selection.
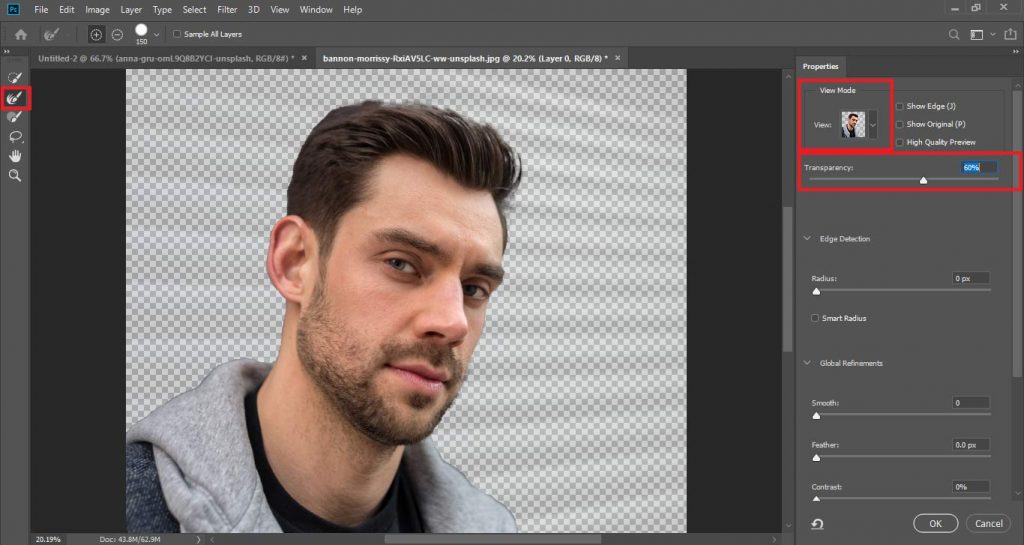
Refining Mask
In case you’re working with fine hair, don’t stress over making the choice excessively exact. We will refine it utilizing the Select and Mask option.
Click on Select and Mask from the options at the top of the workspace.
Using the Refine Edge Brush tool (the icon second from the top, on the left), paint over the edges of the hair.
Check that the View mode is set to Onion Skin and the Transparency setting is around 60 to 70%.
As you work with the Select and Mask, you can add more to what exactly ought to be apparent utilizing the Quick Selection or Brush Tool, or eliminate any overabundance pieces of chosen foundation with the Refine Edge Brush. No surging with this, simply take as much time as is needed.
At the point when you’re prepared, click OK.
Transferring to Scene Image
Now you have your selection active around your subject and you have to copy it to the next image.
Click on Edit > Copy and then go to the next image and go to Edit > Paste.
You can also press Ctrl + C then go to the next image and press Ctrl + V to do this.
Presently we’ll resize and mess with our removed figure to track down the right fit. You can play with size to give a feeling of profundity as well in the event that you wish (like we have here).
You should see that the refinements we added to our determination in the first picture bring about a spotless extraction of fine hair strands, which helps cause the last picture to look more natural.
Resize your extracted image in whichever way you see fit so it looks in place with people in the new image.

Creating Shadows If Needed
To help make the extracted figure appear even more natural, we’ll add shadows under the feet.
Now you have to make a new layer for shadows and name it Shadow.
Using the Brush tool (B) with black (or a dark brown) selected, paint onto where the shadows should appear naturally.
Remember to set the brush hardness to zero (see next step) for a softer look.
Change the Shadow layer’s Blending Mode to Overlay.
If your shadow is not intense and you want to intensify the shadow make a copy of the Shadow layer to intensify the shadow.
Reduce the opacity of duplicate of the ‘Shadow’ layer to make it look more regular. Play around with the shadow until it looks right.
Adjusting Brightness and Contrast
Next, you may need to adjust the brightness or contrast of the added figure to match it to the background image.
To compare only between the Brightness and contrast of extracted layer and scene image you can make a Black and White adjustment layer above all and after adjusting the Brightness and Contrast you can delete the Black and white adjustment layer.
In order to do that, select the layer with the extracted subject layer and in Layers Panel click on the Adjustment layer button at the bottom of the Layers palette.
Note: Hold down Alt (or Option on Mac) and click on the adjustment layer. This will make sure the adjustment layer only affects the layer immediately below and not all the layers.
Utilize the sliders to mess with the brightness and contrast levels until you get something that looks regular, natural, and matches the levels of the background image.

Adjusting Colors
You may also want to adjust the color balance to match colors with the background. Because if your scene is bluish so you should make extracted subject a little bluish by making a color balance layer and increase that color a little bit. But don’t overdo this color.
Hold Alt/Option and click between color balance adjustment layer and below layer again so that it only affects the extracted figure and not the background image.
If you don’t want to match colors by using the Color Balance method there is another simple and easy method to do that in just one minute.

Matching Color
To match the color you just have to duplicate the background layer and place it above all layers and make it a clipping mask by right click and select Create Clipping Mask.
Then apply a Gaussian Blur of 150 pixels by going to Filters > Blur > Gaussian Blur.
Then change its Blending Mode to Hue so that it only affects the Hue of the subject layer.
Now finally decrease its Opacity to 30% – 40%.
By doing this you don’t need to make a color balance layer and adjust colors.

Here we have our final image in which we added a person successfully and this is how to photoshop someone into a picture. You just have to co

Watch Video For More Info:

I’m a Graphic Designer with 5+ years of experience. Specialized in Adobe Photoshop.
Get Info About Any Photoshop Editing, Photoshop Manipulation, Logo Design, Flyers, Business Card, Cartoon Portrait and any type of work-related to Graphic Design and Photoshop Editing.


