We see movies poster and website posters every day, and they are a great addition to your marketing campaign. Wanted to know how to make a poster in Photoshop?
According to my design experience, for a poster design or template, we need some key elements in the poster which will complete its design automatically.
Specifically, while discussing movie posters, we must have the subject image for the poster in the middle, the title in the center bottom, and optionally, the names of any characters who are connected to the poster.
You can add your logo on the top of posters if you’d like and the main image is to enhance the message so we should edit that image accordingly.
If these things are in your poster and aligned professionally then you are good to go.
The image we provide in the poster needs to be summarizing the whole concept. You have to let the readers of your design know what you are endorsing.
In this tutorial, I’ll show you how to create a poster in Photoshop with step-by-step guide, and by using these techniques you can make a poster of any kind whether it’s a movie poster or a website poster, or anything.
In this article, we’ll design a large billboard size vertical poster that includes all the essential elements.
Then after learning those techniques, you can apply these techniques to any size of poster or banner to design you want. You can make both horizontal and vertical posters.
Let’s Go For It!
Table of Contents
How to Make a Poster in Photoshop?
Before starting any thing you have think that complete the requirements of the journey.
Thing You Need
For a poster design, obviously, first, you need Adobe Photoshop and then you need some other assets like fonts and pictures of your product or any model related to your banner.
With that you also need to have a best laptop that will add five stars in your editing and make it looking like a pro.
Step 1: Setting Up a Banner Design File
We can take any size we want but for this example, I am going to use an A4 size to make this poster.
In Photoshop, go to File > New. Name the document of your choice. Set the file to the following dimensions:
- Width to 2480 px
- Height to 3508 px
- Resolution to 300 px
- Colour Mode to RGB
Then click Create.
Also, you can just go to the presets of the new document and select the A4 size in the Print section to get this size.

Step 2: Adding Background
First of all, we have to add an attractive background to enhance the base of our poster.
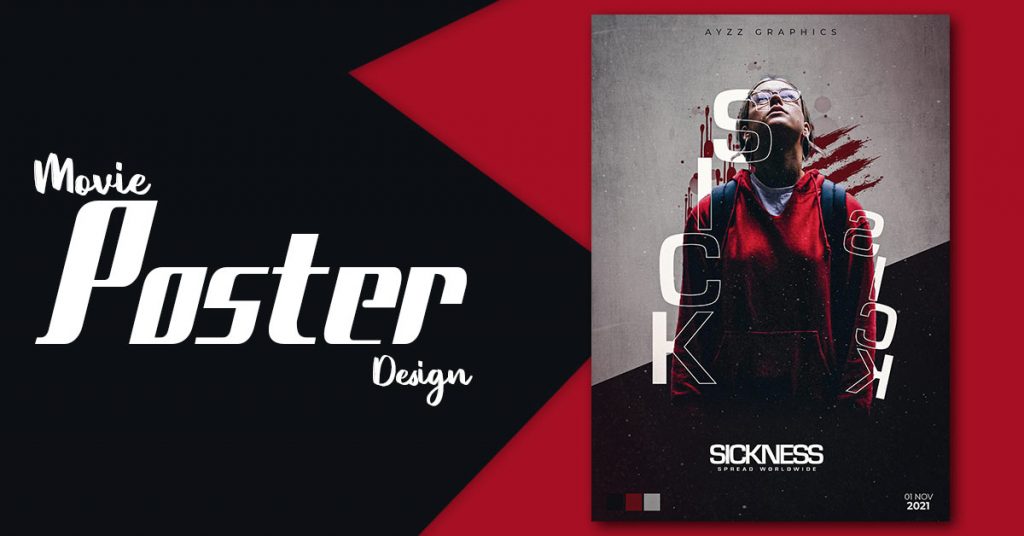
In this article, I’ll be designing a Horror and Blood related movie poster in Photoshop as an example.
But these techniques can be applied to any other design also.
Go to Layers Panel and add a Solid Color Adjustment Layer and take a little light black color, I’m not using full dark black color. The color I’m going to use has Color Code: 121212.
Now I’m going to make a rectangle of Color Code: 121212 and rotate it on the upper half of the poster.
By this technique, I have my two-colored background ready to rock!
You can also use any pre-made backgrounds from the internet.

Step 3: Adding Main Title (Text)
After adding our background, we first have to add our main text which in this case is the title of the movie.
We’ll add our main title at the center bottom of the poster like we’ve seen a lot of movies posters.
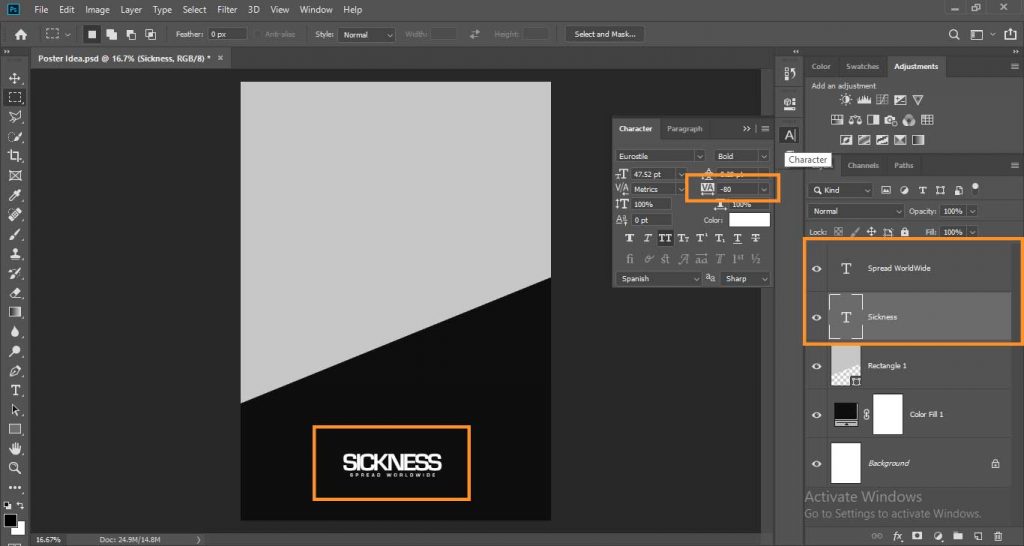
For this, just go to the text tool and select the font you want to use. In my case, I’ll use Eurostile Bold and make sure that the color is white.
Now write the main text as my title is SICKNESS and then the main thing is that we should make our title different from any other text used on the poster and to do so you can do any little thing you can.
You can add a gradient to it or anything but in this example, I’m just going to decrease the churnings of text and for this just go to the properties of text, Advanced set the churnings to -80.
I’m also going to add a tagline, you can add names of characters or anything you want and set the text size to a very small size and I’m going to increase the churnings a little bit.
Step 4: Importing Main Image And Editing It
After adding a background and main text, we have to add the main image on which our poster is based.
Like in this example, I have a character model related to the movie poster I’m designing so I’ve imported it and aligned it on the Center of the poster document.
Now I’m going to edit my main edit to get more concept from the image and to do that I’m going to add some bloodstain behind the character and align them accordingly.
Also, I’m going to add some text around the model to make it look more professional.
We’ll keep the text behind the character with a little part of the text visible from the character.
You can also make a duplicate of the text, set its Fill to 0%, and add a stroke of 5%.
Then place this duplicated text layer above the character layer to make its stroke visible.
Now we have our text hidden behind the character and half part of it visible in the form of a stroke.

Step 5: Adding Logo or Company Name
We have two essential elements in our poster, we have our main image or subject and also we have our main text or title with tagline.
Now it’s time to add our company name or if you want any logo.
In this example, I’m going to just add a text as a logo on the top of our poster which is “A HackGraphic Orignal Series”.
Align it accordingly and increase the churnings a little bit.

Step 6: Adding Other Details
Now we have some empty space at the bottom of our poster we should add something there.
We can add the date of release and anything we want. It could be a text or logos of organizations.
For this example, I’m adding a date on the right bottom of the poster and color codes that are used in this design on the right bottom of the poster.

Step 7: Final Touches
Finally, we have all of the essential parts of the poster ready to rock. We have our main image or subject, we have our main text or title with tagline, logo, and other details.
For increasing your work and save your time you need a best mouse for designing work.
Now here comes the fun part in which we will retouch this poster to make it look very more professional and grungy according to our theme.
First, I’m going to add a grunge gray retro texture on the whole composite and set its Blending Mode according to the composite, and decrease the Opacity to about 45% – 50%.
Then we should add particles images with the black background and set its Blending Mode to Screen to hide the black areas and only show the particles.
We can change its Opacity to about 60%.
You can skip all the next parts if you think your poster looks enough in these steps but I’ll refer you to add more adjustments.
After that we need all the layers merged in a new layer and for this Press Ctrl + Shift + Alt + E to merge all layers into a new layer.
Now we have our whole poster in one layer so we can add filters to it to make it look more elegant.
Go to Filters and click on Camera Raw Filters.
In-Camera Raw Filters, Increase the clarity and texture to about 30+ and click OK.
Now again go to Camera Raw Filters and go to presets then in the Grain section add a Light grain and In Sharpening, section adds a Light Sharpening, and in Vignetting section select a Medium value then click OK.
You can add filters according to your preferences but these are just my suggestions.

Conclusion: How to Design a Poster in Photoshop?
Finally, we have our poster ready to rock!
We’ve learned how to make a poster in Photoshop specifically movie poster Photoshop.
We learned all essential elements so we just need to change the theme and elements to make a new poster.
We have all techniques in our minds to designing a poster in Photoshop, we can make a poster of any kind.

Frequently Asked Questions
In Photoshop, to make a poster, start a new document, choose its dimensions, add text and photos, apply effects, organize your work using layers, play about with the contrast and colours, then save it in the format you want. Try out different features and tools to create a distinctive design and follow the above guide for more accurate guide.
Lay the groundwork first.
Prepare an outline in step two.
Choose your color palette.
Include the pictures.
Include a copy.
Ensure that it’s simple to see your CTA.
The typical poster size in Photoshop is 24 x 36 inches but this Photoshop poster size may vary according to the client requirements and where you want to add this poster. So, keep everything in mind before selecting the Photoshop poster size.
To create an A4 size document in Photoshop, go to “File,” select “New,” set width to 8.27 inches and height to 11.69 inches, choose resolution, and click “Create.” Ensure units are set to inches for accurate sizing.

I’m a Graphic Designer with 5+ years of experience. Specialized in Adobe Photoshop.
Get Info About Any Photoshop Editing, Photoshop Manipulation, Logo Design, Flyers, Business Card, Cartoon Portrait and any type of work-related to Graphic Design and Photoshop Editing.


